Should You Update Your WordPress Plugins?
Yes! Updating a WordPress plugin is just as important as updating the operating system on your mobile or desktop. Running outdated plugins is like using an old OS or old apps. You miss out on important bug fixes, performance improvements, and security patches that many of the
best WordPress plugins are designed to deliver.

If you don’t update it, your website can become vulnerable to security threats, compatibility issues, and functionality problems. WordPress plugins are basically
software applications that add
extra features and
functionality to a WordPress website. For example, with plugins you can:
These plugins connect with WordPress through “
hooks,” which allow them to add new
features,
change behavior, or
display extra content. Since plugins handle many important tasks on your website, developers
regularly release updates to improve security, fix bugs, and enhance performance. Keeping your plugins updated ensures your site remains safe, fast, and reliable.
How To Update WordPress Plugins Properly?
Keeping your plugins updated is one of the easiest ways to secure and
optimize your WordPress website. Outdated plugins can create security vulnerabilities, slow down performance, or even break your site. Here’s a
step-by-step guide to updating plugins the right way.
1. Back Up Your Website
Before making any changes, create a full backup of your WordPress site, including the database and files. This gives you a restore point in case something goes wrong.
2. Check Plugin Compatibility
Read the plugin’s changelog and make sure the update is compatible with your current version of WordPress and other active plugins. This helps avoid conflicts.
3. Use a Staging Site if Possible
If you have access to a staging environment, apply updates there first. This lets you test new versions safely without affecting your live website.
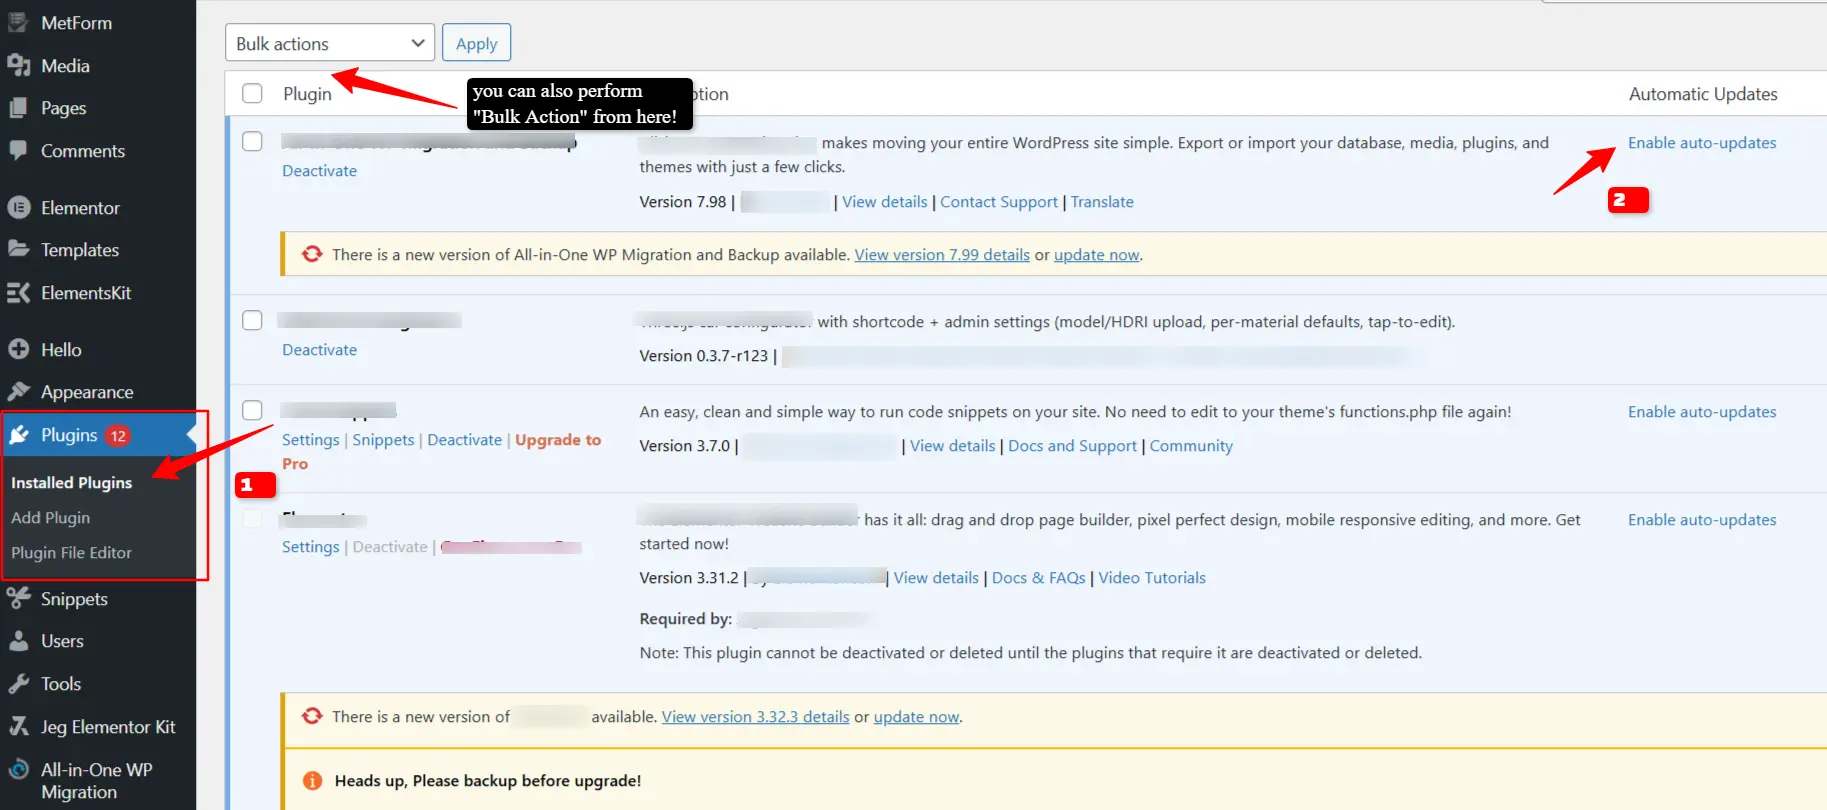
4. Update Plugins from the Dashboard
The simplest way to update is through your WordPress admin area:
-
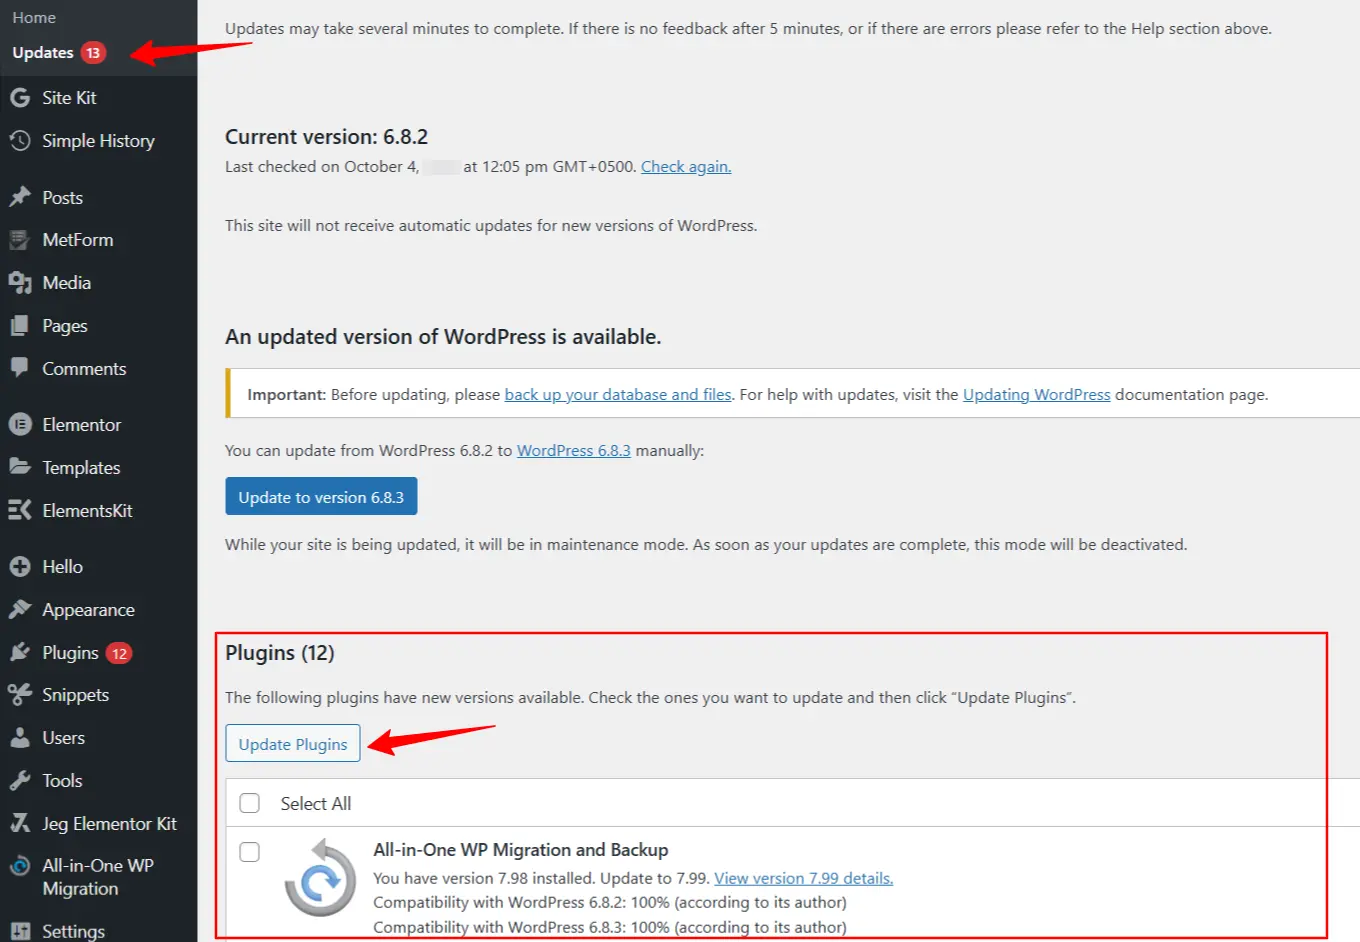
- Go to Dashboard » Updates to see all available plugin updates.
- Select the plugins you want to update and click Update Plugins.
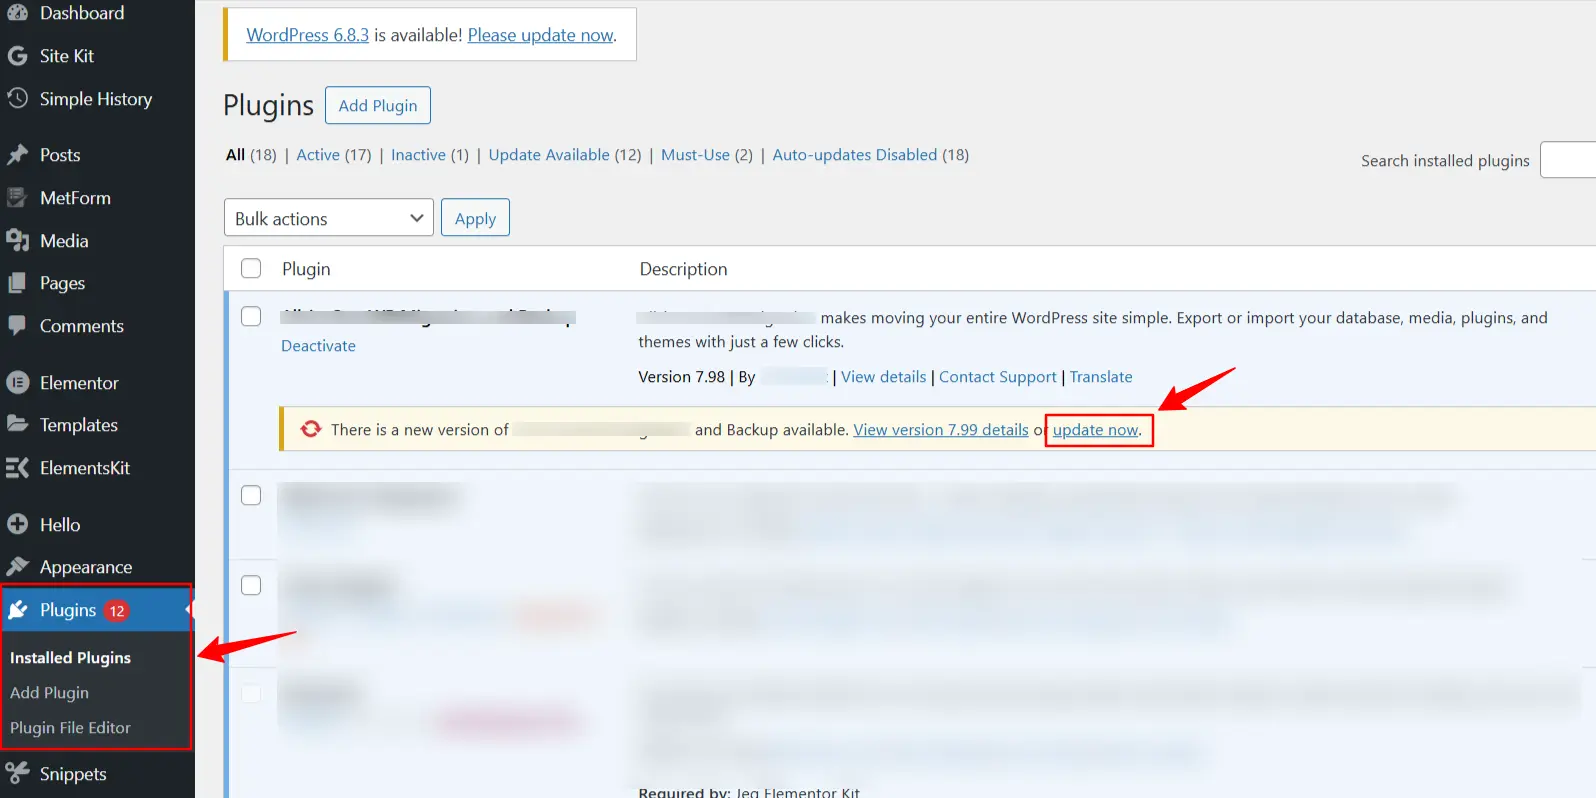
- Alternatively, visit Plugins » Installed Plugins and click Update Now next to each plugin.
5. Update Plugins One by One
Instead of updating everything at once, update plugins individually. This way, if a problem occurs, you’ll know which plugin caused it and can roll it back.
6. Clear Cache and Test Your Site
After updates, clear your site and browser cache. Then test important areas like the homepage, forms, checkout, and login page to ensure everything is working properly.
7. Remove Unused Plugins
Finally, delete plugins you no longer use. Even inactive plugins can create security risks if they’re outdated.
Checklist To Follow For Updating WordPress Plugins
Updating WordPress plugins is more than just clicking “
Update Now.” A
proper checklist ensures your site remains secure, fast, and functional. Here’s a complete checklist to follow every time you update your plugins:
Before Updating
Take a Full Backup
Create a complete backup of your website, including the database and files. This ensures you can roll back quickly if something breaks.
Check Plugin Compatibility
Verify that the plugin update supports your version of WordPress, PHP, and other active plugins. Look for notices on the plugin page or changelog.
Review the Changelog
Read the update notes to understand what’s changed. Look for security fixes, bug patches, or new features that might affect your site.
Test in a Staging Environment
If available, clone your site to staging and test the updates there before applying them to the live site.
During Updating
Update Plugins One by One
Avoid updating all plugins at once. Update each plugin individually so you can easily identify the cause if something goes wrong.
Use the Dashboard or Manual Upload
⇒ From your WordPress dashboard, go to Dashboard > Updates or Plugins > Installed Plugins and click Update Now.
⇒ For premium or custom plugins, download the latest version and upload it via Plugins › Add New › Upload Plugin.
Enable Maintenance Mode (Optional)
For busy sites, temporarily enable maintenance mode during updates to prevent broken pages for visitors.
After Updating
Clear Cache
Clear your website cache, CDN cache, and browser cache to ensure you’re seeing the latest version.
Test Site Functionality
Check key pages like the homepage, blog posts, forms, checkout, and login. Make sure everything is loading and functioning properly.
Monitor for Errors
Review your WordPress error logs or server logs for PHP warnings, fatal errors, or conflicts.
Rollback if Needed
If an update causes issues, restore your backup or install a previous version of the plugin.
Remove Unused Plugins
Delete any inactive or outdated plugins to minimize security risks and improve performance.
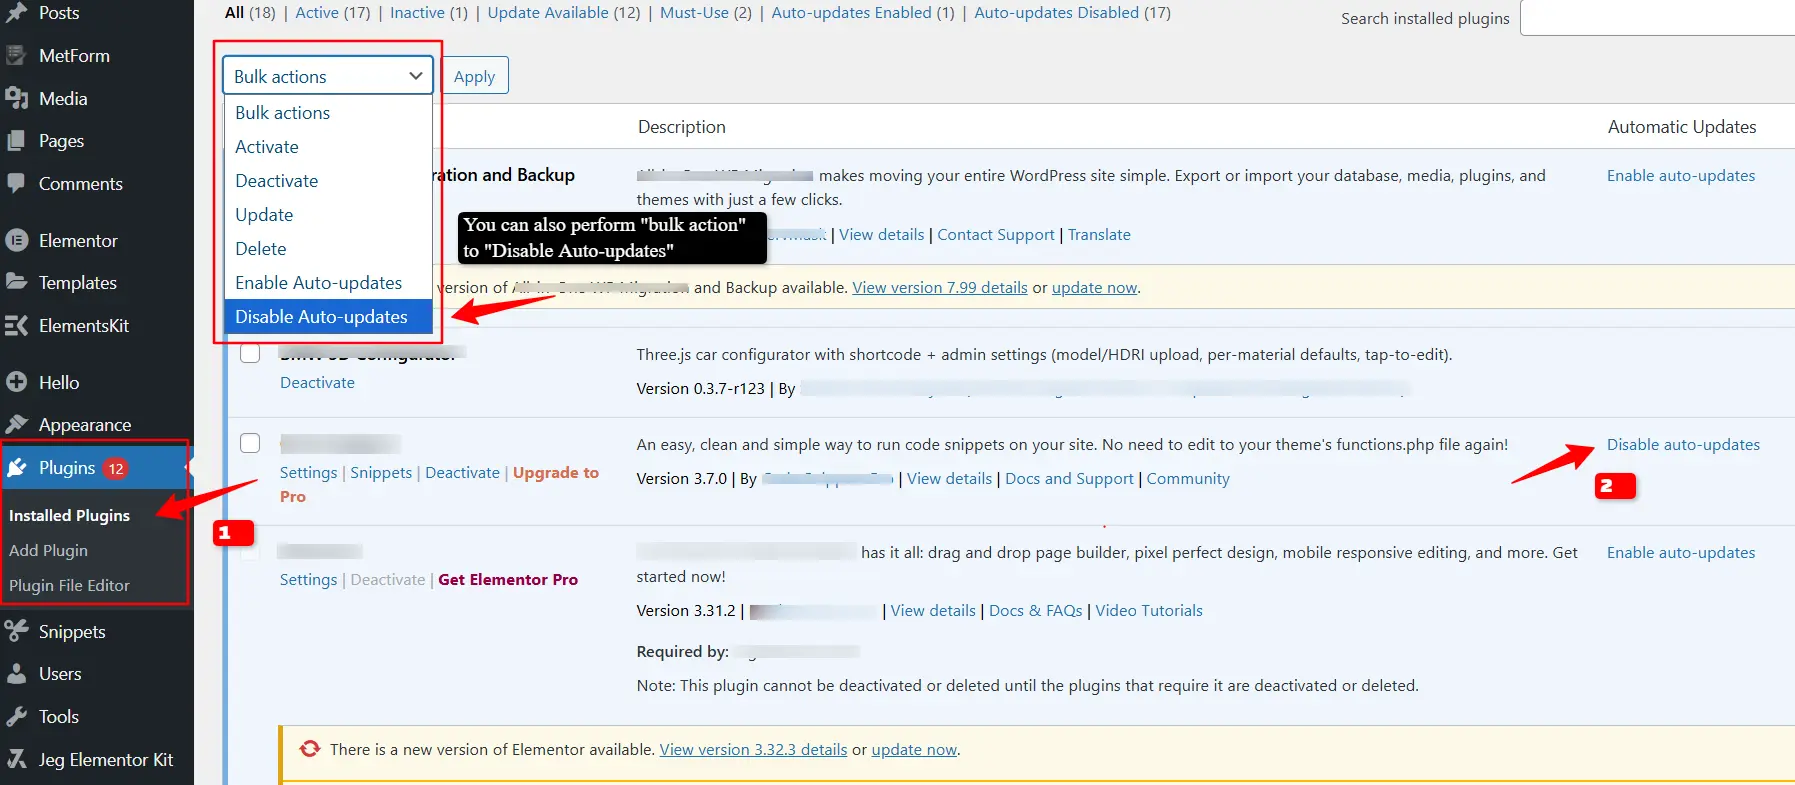
How To Update WordPress Plugins in Bulk?
If you manage multiple WordPress sites, updating plugins one by one can be time-consuming. WordPress.com makes it easier by allowing you to update plugins across all of your sites at once. Here’s how you can bulk update WordPress plugins properly:
1. Access the Sites Page
Click the “
W logo” in the upper-left corner of your
WordPress dashboard. This will take you to the Sites page, where you can manage all of your
WordPress.com sites in one place.
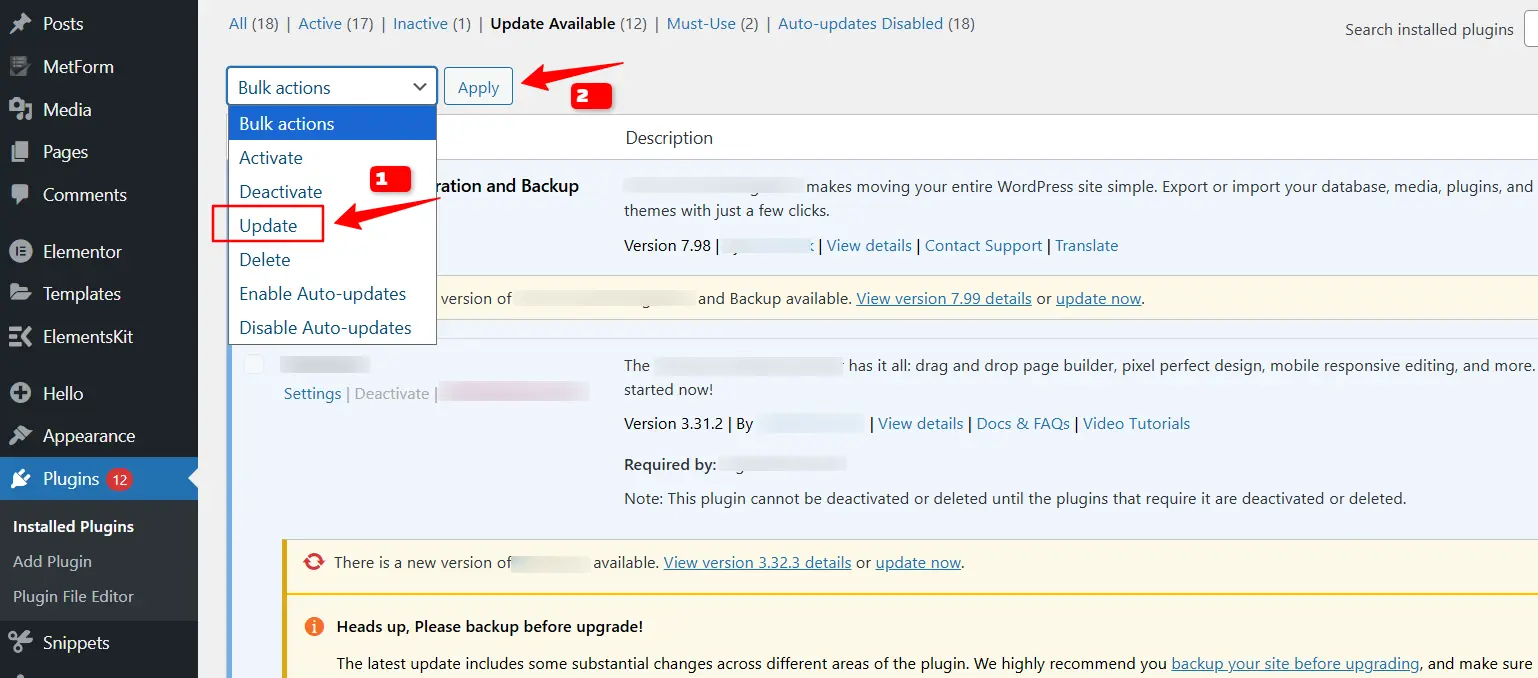
2. Open the Plugins Section and Check the Available Updates
On the left-hand panel, click
“Plugins” > “Installed”. In the newly opened page, click “
Update Available“, and this will take you to the section where all pending updates are listed. Click the “
Check Box” at the top of the list to select all plugins at once.

3. Perform Bulk Action
Click “
Bulk Action” and a dropdown box pops up with multiple options, select
“Update”. Once you have varied your selected plugins, click
“Apply” to perform a bulk action.
Why Bulk Updates Are Useful?
- Time-saving: Update multiple sites with a single click.
- Consistency: Ensure all your sites run the same, most secure plugin version.
- Security: Reduce the risk of attacks by keeping plugins updated everywhere at once.
Bulk updating is a
great option for WordPress.z users who manage multiple sites. However, if you run high-traffic or have
custom-built sites rather than templates, it’s still best practice to test plugin updates in a staging environment before rolling them out everywhere.
How To Manually Update WordPress Plugins
Updating your WordPress plugins manually is essential when automatic updates fail or if you want more control over the update process. Whether you’re troubleshooting plugin issues or looking to avoid conflicts with new updates, learning how to manually update plugins can help maintain your site’s security, performance, and stability.
Here are the most reliable and effective methods for manually updating your WordPress plugins.
Update WordPress Plugins via SFTP or FTP
For situations where the WordPress dashboard update is unavailable or fails, SFTP or FTP provides a manual solution.
- Backup Your Website: Always start by creating a complete backup of your WordPress site to avoid data loss.
- Download the Latest Version of the Plugin: Download the latest plugin version from the official plugin repository or the plugin developer’s website.
- Connect to Your Server Using SFTP/FTP: Use an FTP client such as FileZilla to connect to your web server. You will need your FTP/SFTP credentials (usually provided by your hosting provider).
- Navigate to the Plugins Directory: Go to the wp-content/plugins directory on your server.
- Rename the Existing Plugin Folder: To ensure you don’t lose data, rename the existing plugin folder (e.g., from plugin-name to plugin-name-old).
- Upload the New Plugin Version: Extract the downloaded ZIP file on your local machine, then upload the extracted folder to the wp-content/plugins directory.
- Activate the Plugin: After uploading, return to your WordPress dashboard to activate the new plugin version.
Why use SFTP/FTP?
This method is beneficial when plugins are
large or
have failed to update automatically. It gives you
full control over the plugin files.
Manually Update WordPress Plugins via WP-CLI
WP-CLI is a command-line tool that allows you to manage WordPress plugins through the terminal, ideal for developers and advanced users.
- Access Your Server via SSH: Use an SSH client to connect to your server.
- List Plugins with Available Updates: Run the following command to check which plugins have updates available:
- List Plugins with Available Updates:
Run the following command to check which plugins have updates available:
wp plugin list --update=available
- Update a Specific Plugin:
To update a particular plugin, use this command:
wp plugin update plugin-slug
- Update All Plugins:
To update all plugins at once, run:
wp plugin update --all
- Verify the Plugin Update:
After running the command, check the WordPress dashboard to ensure the update was successful.
Why use WP-CLI?
WP-CLI is the
fastest method for developers managing multiple sites or needing to
update WordPress plugins quickly via the command line.
By following these methods, you can ensure your WordPress plugins are always
successfully updated manually, keeping your site secure and optimized.
How to Undo WordPress Plugins Update?
Sometimes, updating a plugin on WordPress can cause issues such as broken functionality, compatibility problems, or conflicts with other plugins. If you find that the latest plugin update has caused problems, you can undo it by following these steps:
1. Check Plugin Version History
Before taking action, it’s essential to check whether the update caused the issue. You can find the plugin’s version history and changelog either on the plugin’s page in the WordPress Plugin Directory or within your plugin settings. Understanding the update changes can help you decide if reverting is necessary.
2. Restore From a Backup
If you have a backup of your site from before the plugin update, this is the fastest way to revert. Most hosting providers offer backup solutions, or you might be using a backup plugin like UpdraftPlus. Simply restore the backup, and the plugin will return to its previous version, along with any other necessary files or settings.
3. Manually Revert to an Older Plugin Version
If you don’t have a backup, you can manually install the previous version of the plugin:
- Visit the WordPress Plugin Repository and search for your plugin.
- On the plugin’s page, find the Advanced View and select Previous Versions.
- Download the version you wish to revert to and go to Plugins → Add New → Upload Plugin in your WordPress dashboard to upload and install the older version.
4. Use a Plugin to Roll Back Updates
For a simpler solution, use a plugin like WP Rollback, which allows you to revert any plugin to its earlier version. After installing WP Rollback:
- Navigate to Plugins → Installed Plugins.
- Locate the plugin and click on the Rollback link next to it.
- Choose the version you want to revert to, and the plugin will automatically be rolled back.
To avoid similar problems in the future, consider enabling manual plugin updates or using staging environments to test updates before applying them to your live site. This ensures you won’t face downtime or issues after updates.
By following these steps, you can easily undo a plugin update in WordPress, restoring your site’s functionality without hassle.
How To Schedule WordPress Plugins Update?
Keeping your WordPress plugins updated is essential for both the security and performance of your website. Manually updating plugins can be time-consuming, but with WordPress’s built-in scheduling feature, you can automate the process to ensure your plugins are always up to date. Here’s how to schedule updates for your plugins effectively.
1. Access Your WordPress Dashboard
First, log in to your WordPress admin dashboard. This is the central hub where you manage all aspects of your site, including plugins.
2. Navigate to the Scheduled Updates Section
Once in the dashboard, go to the Plugins menu on the left-hand sidebar. From there, select Scheduled Updates. This section lets you manage and automate your plugin updates, ensuring you don’t miss an important update again.
3. Create a New Update Schedule
On the Scheduled Updates page, click the Add new schedule button. This will open a configuration screen where you can customize how and when your plugins are updated.
4. Choose the Update Frequency
Under the Update every dropdown, you can select the frequency of the plugin updates. You can choose Daily or Weekly based on how often you want your plugins to update. If your plugins receive frequent updates or are critical to site security, setting it to daily is a good option.
5. Set Time and Specific Day for Updates
After selecting the update frequency, choose a specific time of day for the updates to occur. If you selected Weekly, you will also need to specify the day of the week when the update should take place. This allows you to schedule the updates during low-traffic hours, minimizing the impact on your site’s performance.
6. Select Plugins for Scheduled Updates & Finalize The Schedule
Under the Select plugins section, you can choose up to ten plugins that will be included in the automatic updates. Selecting the right plugins ensures that your site stays up to date without overloading the system with unnecessary updates.
Once all preferences are set, click on the Create button. This will save your schedule, and your selected plugins will now automatically update according to the frequency, time, and day you’ve chosen.
7. Monitor Scheduled Updates
To review or edit your scheduled updates, you can always return to the Scheduled Updates page under Plugins. Here, you’ll find a list of all active schedules, providing you with full control over your automated plugin updates.